Less messy litter

Rabbits Online Forum

Help Support Rabbits Online Forum:

This site may earn a commission from merchant affiliate links, including eBay, Amazon, and others.
Also the problem with Delilah’s digging is that it’s a stereotypic holdover from her previous owner. She digs because it makes a lot of noise and was used to get attention from people who otherwise ignored her, even if that attention was negative. So she digs in the litterbox, but also on solid walls. When she had cage bars she’d dig and rattle at them—which was definitely not an attempt at escaping because she’d be furiously rattling the bars of the cage that she was standing next to the open door of, OUTSIDE of the cage. She digs when she’s bored and wants attention, not because she feels the need to dig. So giving her appropriate alternatives doesn’t really do anything, because using the appropriate alternatives doesn’t get her any attention!
 
It's the type of mesh you use that's different. It's a plastic mesh instead of the usual fiberglass, and it's designed to resist damage from pets clawing at it. The edging that I used is a plastic/vinyl edging, normally used for the edges of wall paneling here in the US. I'm not sure if you would have the same thing there.

If you're interested in trying it here's the tutorial on how I made it, or you could just try the screen itself without the edging, but the edging does give it structure so it can't be moved around or edges chewed on by buns. Let me know if the photos don't show up.

(Copied from another thread)
You will need a roll or piece of the correct size needed, of the pet mesh/screen. It's not normal fiberglass window screen, but is a thicker plastic screening made to resist pet damage. I got mine at walmart, amazon has it, as will home improvement stores.
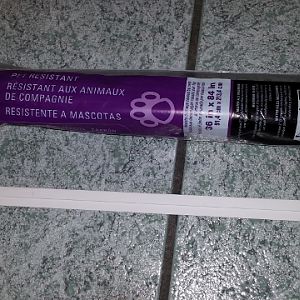

This is the white plastic edging, which I got at Lowe's home improvement. I used the smallest width, which is what you want. There are a few different colors: white, beige, and possibly gray and black if you can find them in the smaller size.
http://www.lowes.com/pd/Sequentia-0...ainscot-Panel-Cap-Wall-Panel-Moulding/4768311

You will need heavy duty scissors to cut the plastic edging, or I used tin snips. If you use the zip ties to attach the edging, you will need something to punch holes in the edging to run the zip ties through. I used a leather punch.

First is taking measurements for the screen size you will need. Make sure to take measurements with the litter in the litter box as this can sometimes affect the size of the screen that you will need. I try and get the screen as close to the edges of the litter box as possible. Too small and it will shift around, too big and it won't fit right.

Once you have the measurements, unroll the screening and mark your measurements out, I used a silver permanent marker so it would show up on the black screening. Cut out your piece of screen. Lay it in the litter box on top of the litter to make sure you got the measurements right.

Next double check your screen measurements by remeasuring it, then use those measurements for your edging pieces. Measure and mark the edging, then make a 90 degree cut. Put each piece along the edge of the screen to make sure your measurements were correct, then with all edges in place, lay the screen into the litter box to make sure the fit is right. You want to make sure it fits before you attach the edges permanently.

Next is assembly. There are two ways I've used. First is the easiest by using zip ties to attach the edging to the screen. You want the smallest 4 inch ties so they fit easily in the holes in the screen. The down fall of this method is that hay and urine collects in the edging channel and you need to use a jet of water to get it out. This lead me to the second method of using 100% silicone caulk to attach the edging to the screen. I got mine at walmart, and make sure you don't get the mildew resistant kind. You want the 100% silicone caulk. I like this method the best as it seals up that channel in the edging so no urine or debris can collect in it, but the downfall is it is somewhat difficult to do and can be messy.

Here is a picture of heavy duty scissors, tin snips, leather punch, and cut edging pieces for both a caulked screen(with the lower lip of the edging cut off so urine doesn't collect on it) and a zip tied screen. You can see how the two zip tied edging pieces assemble at the corner so that the holes on each piece line up to put a zip tie through.
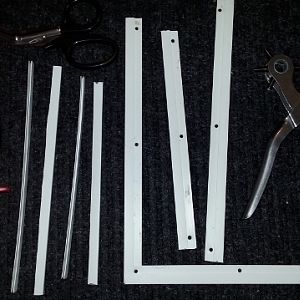


First the zip tie method. I measured and marked where I wanted the holes, then punched holes with the leather punch. Punch the holes for the corner with the two pieces put together so that the holes will line up for putting the zip tie through. Next slide the screen into the channel in the plastic edging. Make sure the screen goes all the way into the back of the channel. Then pass the zip tie through the hole and the screen and secure the zip tie, with the attachment part of the zip tie on the bottom of the screen. Then cut the excess tail of the zip tie off. An alternative to punching holes if you don't have a tool to do it, is to trim the bottom lip of the edging off so that the bottom and top are even, then you wouldn't need to punch holes in it.

Finished zip tied screen.
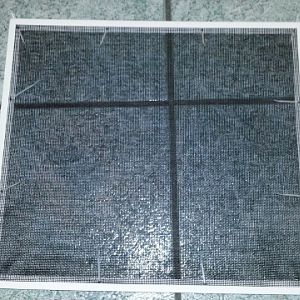

With the caulk method, I first trimmed off the bottom lip of the edging so that both the bottom and top were even. Next lay out some newspaper as a work surface and set your screen piece and edging pieces on it. Have several sheets of paper towels handy for cleaning up excess caulk. If using a new tube of caulk, make sure to cut the end off at a 45 degree angle and make the cut as close to the tip as possible so that the opening is as small as possible. I used a thick piece of wire to pierce the seal on the inside of the caulk(pierce it several times), or buy a tube of caulk that doesn't require a caulk gun to dispense the caulk.

Place the tip of the caulk into the edging gap. I pushed it in so that the edging spread apart some, to make sure all of the caulk went in there. Then slowly draw the caulk gun down the length of the piece as you squeeze the caulk in.
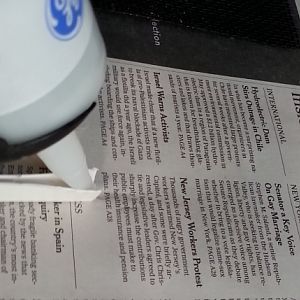


Once there is caulk all along the gap of the edging piece, wipe off any excess with your finger, then slip the edging piece onto the correct side of the screen, very carefully so you don't mess up the caulk too much and make sure the screen sets all the way to the back of the edging channel. Then carefully slip zip ties through the screen an inch or so from the ends(and a zip tie or two in the middle if a large screen) to help secure the edging while it dries. I like to do the long side edging first, then the top and bottom.
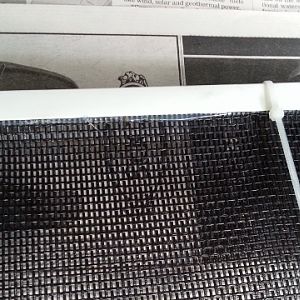


Carefully wipe away any caulk that may have squeezed out of the gap when the edging was attached to the screen. Do the same for the rest of the edges. When done carefully check over the screen for any caulk messes to wipe off. Be careful not to let the screen flex too much as the caulk is still wet. Then lay your screen on a clean piece of newspaper to dry in a well ventilated area. I left it for a week to make sure it was completely dried and cured. Once the caulk is completely dried you can cut the zip ties off and remove them from the screen.
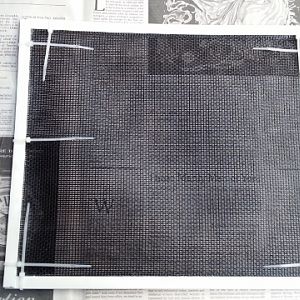


Finished caulked screen.
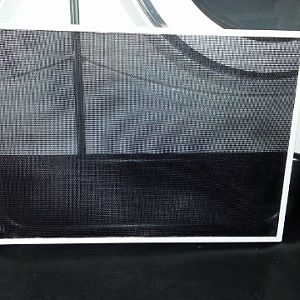

If trying to decide which attachment method to use, the caulk method is the best one as it keeps the screen the cleanest with no gaps for debris and urine to build up in, and so is the easiest when having to wash the screen. But it is a bit tricky getting that caulk into the gap when assembling, without making a huge mess. So if you aren't used to doing caulk jobs. I would suggest not attempting it without a little practice, and being prepared for a bit of a mess with the caulk. I've done a fair bit of caulking jobs, and I found this can be a bit frustrating when that caulk tip keeps slipping out of the gap as you are caulking it.

If you have enough edging, you could start with a screen that is zip tied, then if you think you would like the caulked screen you could give it a try. This way you would also have an extra screen for when you take the other one out for cleaning.

Good luck and if anything isn't clear just let me know and I'll try and clarify.
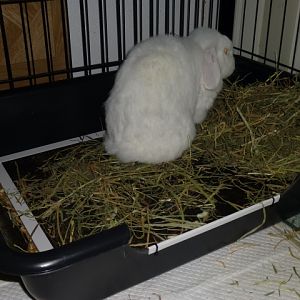
 
Last edited:
Yeah shavings are the absolute messiest and I hate them for that reason! Never again. I use paper pellets, specifically back2nature, but I know there’s also yesterday’s news and other brands. And the wood pellets that a lot of members on here use are simply the wood stove pellets you can buy in hardware stores etc. As long as the wood is untreated and no scents added etc it should be safe for bunnies!
The added bonus is that paper and wood pellets are way better at absorbing smells than shavings and so your room should also smell much fresher!
I use old newspapers in the bottom of litter with fresh hay on top
If changed everyday there is no smell and it’s a quick process for 3 bunnies I get over half a bale of hay a month at a cost of $10
Newspapers are free from stores who have leftovers that didn’t sell
 
I’m not sure why you quoted my post as I didn’t mention newspaper at all, but it’s all about finding what works for you and your bunnies, so sounds like you’ve got a good setup for you!
 
Wow @JBun definitely that’s so nice and detailed! For now it seems that Delilah isn’t digging the litter out as long as the door is closed, but once I’m no longer under the strain of Lahi’s lump removal I’ll have to look into doing that. I kinda half heartedly tried a screen before by using fine-mesh chicken wire with a layer of shavings overtop to protect their feet, with the thought that while I couldn’t stop Delilah from tossing litter everywhere I could limit how much of it she could toss. I was always too worried about Lahi’s sore hocks to leave it bare.

This was an addition to a home-made enclosed litter box with a swinging door, previous attempts to keep her digging contained. She always foils me!

Hopefully she won’t find something devious to get around the pet screen
 
@Blue eyes @Popsicles the aspen wood pellets are working great, I like how obviously compostable they are, breaking down into something that already looks like it could belong spread over a garden. And while I can smell the wood pellets a fair bit, it’s not necessarily a bad smell and it’s actually stronger than any pee smell. I’m now going on a full purge of wood shavings, MAY THEY NEVER STICK TO MY SOCKS AGAIN!!

Is you’re suuuuuuure pine pellets are okay, I’ll likely buy some Feline Fresh pellets from my store next time, they’re a better cost per weight than the aspen.
 
I've used pine pellets for years, and they've been great. Feline pine is a good option, but if you want a cheaper one and are near a feed store, the ones used for horses can be used too and are a few dollars cheaper. I've found not all wood pellets are equal. Some just seem to absorb the urine and odor better than others.
 
But you’re sure the pine pellets don’t have the same phenol issue as pine shavings? I was using pine shavings for years without issues before I found out that it could cause some.

When I explain it to other people I tell them “phenols are that woodsy aroma we love from cedar wood”. I opened the bag of aspen pellets and got a blast of wood scent, and that’s hardwood!

But yeah since I work at a pet health food store, being able to buy the Feline Fresh right there is nice and convenient. And I get a 20% employee discount. And if I’m really lucky I might get straight-up free bags from the distributor rep—unsurprisingly an employee being able to say “this is what I use for my pets so I can personally tell you how great it is” sells well, so companies will often offer to give pet store employees free food. Not sure about litter, though.

Anidis wouldn’t give me free rabbit food :’( the rep was over the moon happy to hear I feed them Versele Laga and got me to switch from their Cuni Nature variety to Cuni Complete, but because they’re a distant Scandinavian company she couldn’t negotiate any staff feeding for me. She promised that she’d give me any bags that customers returned that were open, but I have little to no hope of that happening, the food’s bloody amazing both for nutrition panel and how much buns love it.

Alternatively I also work at a research facility and could buy bulk bags of bedding cob from them wholesale, and that would definitely be suuuuuper cheap but... bunnies =/= corn. Also it would possibly make almost as much of a mess as shavings.
 
Hello,

Thanks to all for all the detailed information. I had never researched the base on which phenol could be a cause for an allergy to a processed wood product, but I remember how carpenters I worked with years ago would smell very strange to me, and it usually caused me some nausea.

At the beginning of Maxi's stay in the house we had bought some pellets for the litter bottom of his cage. They smelled so much that I left them out under sunshine which only slightly improved the projection of the smell. I think that the process with which wood is used to produce a closed-cell shape such as pellets is harmful to the trees the wood is produced from. I never used those pellets. I used some shavings, only for a very brief period, but soon I discovered I could exchange the pellets with litter material for cats I could buy from the nearby store. The material is small stone-like particles, it is heavy, so far has not hurt Maxi's paws and cannot be taken out of the litter tray in great amounts; just some small stones become air-born by Maxi jumping out of the tray.

The condo is amazing, Liung. I saw a cabinet made for small pets at a pet-store, but as I cannot transport it myself, and cannot fit it through the doors, I decided to design, too, my own, when the time comes. I will share some sketches of what I decided to do, later. I based the design on the shape, orientation and details of the room where Maxi lives, but also will try to fit the base of a fabricated cage, or a whole cage. My reason for disliking the fabricated cages was that the sides were all metal, the base was only plastic, and the overall feel to my sense did not bring about too much assurance of its longevity and value; even the wooden cages look not safe, and not stable enough to me. One of the reasons I liked your condo was because everything looked very solid, and safe.

Early in Maxi's life I realized that the Rabbit, or Maxi, was a very intelligent animal, just, perhaps, all other types of animals are, and it cannot live in an unsafe, unstable environment, materially or psychologically. Maxi has made me very intelligent in order to withstand his mental attacks, for which he usually soon feels guilty, which reminded me of him being like my late father was, angry only in moments and as sparks, but never hateful, and never, for long!

I so love this Rabbit Maxi!

Regards,
Sonya and Maxi
 
I use the brand of aspen pellets you posted! They hold the smell and seem to work really well. :)
 
Oh my god it’s been over a week now, the litter box is so full but there is NO SMELL and NO MESS.

WHERE HAS THIS BEEN ALL MY LIFE. I’m recommending it to all my bunny customers. One tried it and then decided against continuing since she felt it wasn’t a soft enough bedding for her buns... but THATS WHAT THE HAY ON TOP IS FOR

SHOUT IT TO THE WORLD ABANDON WOOD SHAVINGS SWITCH TO PELLETS EVERYTHING IS WONDERFUL.
 

Latest posts

Back
Top