You are using an out of date browser. It may not display this or other websites correctly.
You should upgrade or use an alternative browser.
You should upgrade or use an alternative browser.
NIC Cages Only-Now Closed
- Thread starter Pipp
- Start date

Help Support Rabbits Online Forum:
This site may earn a commission from merchant affiliate
links, including eBay, Amazon, and others.
tamnjo
Well-Known Member
I changed my cage too. It is approx 17 sqaure feet now! I'll post a pic later. Nice cage!:brownbunny
TrixieRabbit
Well-Known Member
This is Trixie's cage from when she used to live with me. She loved the "penthouse" level:


We used binder clips to"lock" the front door closed. Zip ties to hold the door to the cage, of course.

Here are the plans:
45 - 14" x14" grids (Bed Bath and Beyond: $14.95 each box)
1 large sheet (4 ft x 8 ft) of 1/2" thick plywood (Home Depot cut it tosize for free) for base and shelves. 1st piece (base)cut to 28w x42 L; 2[suP]nd[/suP] piece (first shelf) cut to 28w x 28L; 3[suP]rd[/suP] piece, for top level should be 28w x 42L
1 large sheet (4 ft x8 ft) of peg board for shelves (to lay above plywood-also cut for free at Home Depot)
Approx. 8-3/4" x 1 3/8"long wood sticks for supporting the roof and shelves and to go around sides of base (not exactly sure how many were used, we cut them down to size. This size also fits in the grid holes. You can use a diff size, just measure the grid holes to see what size you will need)
Zip ties
4 small casters (wheels) for base
Approx 20 -12" x 12" peel-n-stick linoleum tiles for base only (you don't have to use limoleum tiles, but it makes it easier to clean up any spilled water or urine if the bunny misses her litter box)
small screws (I forgot how long)
Drill
Saw
The cage is 3 grids wide x 2 grids deep x 3 grids high. So 42"w x 28"deep x 42" high
Cage walls and shelves:
[/b]First we zip-tied all the grids together, starting with the front and back of cage, then sides. We then attached the sides to the back part of the cage (don't attach the front until the end or else you will have problems attaching the shelves)
After zip-tying the back and sides, you can now make the shelves.
Bottom shelf is 3 grids wide and 2 grids deep, making an L-shape, and is zip-tied on all corners to the back right of the cage where the 2nd row of grids attach to the bottom row of grids(see photo)
Top shelf is almost the entire width and depth of the cage, but with one grid opening above the first level so the bunny can hop up and down....
If you see the photos, it makes more sense.
You then pre-drill holes in the plywood to zip-tie them to the shelves and sides of the cage.
Measurements for the shelves are above.
You will need to saw a little bit to make the L-shape for the shelving and the top level.
(See photo)
***PLEASE NOTE:[/b] You DON'T have to use plywood for theshelves. I used plywood covered with linoleum tiles before[/b] I learned about PEG BOARD. The linoleum is best for the base for easy spill cleanup, but my bunny likes the peg board better for the shelves since it is a lot less slippery. She wouldn't even go on the shelves until I placed the peg board over the linoleum-covered shelves.
The peg board also comes in 4ft x 8ft sheets at Home Depot. It cost about $10 for a sheet. The peg board is inexpensive, has holes already in it so you can just zip-tie them to the grids, and if you place itrough side up on the shelves, it provides traction for the bunny's feet and is not slippery at all! The cool thing is, the peg board is also made from compressed wood chips and is a lot safer to chew than linoleum tiles. (She cant really chew the base, so it's ok to uselinoleum there)
I simply placed the peg board over the plywood shelves (rough side up)and zip tied them through the holes already drilled in the plywood. I kept the plywood b/c I found it provides a little extra support for the shelves, but you really don't need it.
Place (1) 3/4"x 1 3/8" stick (cut to 28 inches in length) through the grid holes under the first shelf for support.
For the BASE:[/b]
The plywood was cut into 3 pieces: 1st piece for the base is 28"w x 42"h. The other 2 pieces are for the shelves.
Line the base with peel-n-stick linoleum tiles. I used a rolling pin to get the air bubbles out so they stick better.
You will then need 3 long sticks for the base edge, which keeps the cage from sliding off the base at the bottom. You need (2) 28? longsticks (3/4" x 1 3/8"long wood sticks ) for the sides of the base and (1) 42? long stick for the back.
Leave the front clear so the door of the cage can swing open.
Pre-drill holes into the plywood and the sticks so they don't crack when you screw them in.
You then screw the sticks to the back and sides of the base, making an edge.
Screw the wheels onto the bottom of the base.
Make sure they are a little more in the middle of the base in case the plywood is a little bent, this way the wheels will be more likely totouch the floor and the cage won't wobble as much if the plywood is slightly uneven.
We also screwed another 42? long 3/4" x 1 3/8"wood stick underneath the base of the cage just under where the front of your cagewill be for support. Since this is where your door will need to be able to swing open, you can't have a "lip" on top, has to be underneath.
Also, screw holes in the base around the inner perimeter of the "lip" so that you can zip-tie the bottom of the cage to the base. You can make 4 drill holes in the front of the base only if you want, since the backs and sides will already have an edge. The front of the cage can't, because you need the door to open, so you can zip-tie the front grids(not the 2 for the door) to the base to keep the front bottom edge ofthe cage from buckling in or out.
Now, you are ready to attach the top of the cage and the FRONT of the cage.
For the FRONT:
Zip-tie 3 rows of grids, 3 grids across. Fasten them to the sides of the cage.
Leave the vertical middle 2 grids untied on the left sides, bottom and top (keeping the 2 grids tied together in the middle and right sideonly-see photo). This will be your door.
Use 2 binder clips to hold the door shut.
For the TOP:
I zip tied 6 grids together (2 rows of 3 grids)
Then I zip-tied the BACK ONLY of the top to the back of the cage, DONOT TIE TO THE SIDES. You want the top to hinge open, so don?t fasten the sides or front.
Now you need 1 of your 42? long sticks. I drilled a hole on each end and stuck it through the grid holes going across the top MIDDLE of thecage. I zip-tied the stick to the sides of the cage to keep it from slipping out. This provides support for the top grids and keeps them from sagging down.
THEN, I got another 42? long stick, drilled 4 holes through it, 1 oneach end and 2 in the middle, and I zip tied it to the front edge ofthetop grids of the CAGE FRONT. This also provides more support and allows the top edge of the roof to lay on the top of the cage and not sink into the cage. (See photo)
I hold the top lid down with binder clips to keep the bunny from getting the top open.
That's it!
Hope this made sense
~Denise
We used binder clips to"lock" the front door closed. Zip ties to hold the door to the cage, of course.
Here are the plans:
45 - 14" x14" grids (Bed Bath and Beyond: $14.95 each box)
1 large sheet (4 ft x 8 ft) of 1/2" thick plywood (Home Depot cut it tosize for free) for base and shelves. 1st piece (base)cut to 28w x42 L; 2[suP]nd[/suP] piece (first shelf) cut to 28w x 28L; 3[suP]rd[/suP] piece, for top level should be 28w x 42L
1 large sheet (4 ft x8 ft) of peg board for shelves (to lay above plywood-also cut for free at Home Depot)
Approx. 8-3/4" x 1 3/8"long wood sticks for supporting the roof and shelves and to go around sides of base (not exactly sure how many were used, we cut them down to size. This size also fits in the grid holes. You can use a diff size, just measure the grid holes to see what size you will need)
Zip ties
4 small casters (wheels) for base
Approx 20 -12" x 12" peel-n-stick linoleum tiles for base only (you don't have to use limoleum tiles, but it makes it easier to clean up any spilled water or urine if the bunny misses her litter box)
small screws (I forgot how long)
Drill
Saw
The cage is 3 grids wide x 2 grids deep x 3 grids high. So 42"w x 28"deep x 42" high
Cage walls and shelves:
[/b]First we zip-tied all the grids together, starting with the front and back of cage, then sides. We then attached the sides to the back part of the cage (don't attach the front until the end or else you will have problems attaching the shelves)
After zip-tying the back and sides, you can now make the shelves.
Bottom shelf is 3 grids wide and 2 grids deep, making an L-shape, and is zip-tied on all corners to the back right of the cage where the 2nd row of grids attach to the bottom row of grids(see photo)
Top shelf is almost the entire width and depth of the cage, but with one grid opening above the first level so the bunny can hop up and down....
If you see the photos, it makes more sense.
You then pre-drill holes in the plywood to zip-tie them to the shelves and sides of the cage.
Measurements for the shelves are above.
You will need to saw a little bit to make the L-shape for the shelving and the top level.
(See photo)
***PLEASE NOTE:[/b] You DON'T have to use plywood for theshelves. I used plywood covered with linoleum tiles before[/b] I learned about PEG BOARD. The linoleum is best for the base for easy spill cleanup, but my bunny likes the peg board better for the shelves since it is a lot less slippery. She wouldn't even go on the shelves until I placed the peg board over the linoleum-covered shelves.
The peg board also comes in 4ft x 8ft sheets at Home Depot. It cost about $10 for a sheet. The peg board is inexpensive, has holes already in it so you can just zip-tie them to the grids, and if you place itrough side up on the shelves, it provides traction for the bunny's feet and is not slippery at all! The cool thing is, the peg board is also made from compressed wood chips and is a lot safer to chew than linoleum tiles. (She cant really chew the base, so it's ok to uselinoleum there)
I simply placed the peg board over the plywood shelves (rough side up)and zip tied them through the holes already drilled in the plywood. I kept the plywood b/c I found it provides a little extra support for the shelves, but you really don't need it.
Place (1) 3/4"x 1 3/8" stick (cut to 28 inches in length) through the grid holes under the first shelf for support.
For the BASE:[/b]
The plywood was cut into 3 pieces: 1st piece for the base is 28"w x 42"h. The other 2 pieces are for the shelves.
Line the base with peel-n-stick linoleum tiles. I used a rolling pin to get the air bubbles out so they stick better.
You will then need 3 long sticks for the base edge, which keeps the cage from sliding off the base at the bottom. You need (2) 28? longsticks (3/4" x 1 3/8"long wood sticks ) for the sides of the base and (1) 42? long stick for the back.
Leave the front clear so the door of the cage can swing open.
Pre-drill holes into the plywood and the sticks so they don't crack when you screw them in.
You then screw the sticks to the back and sides of the base, making an edge.
Screw the wheels onto the bottom of the base.
Make sure they are a little more in the middle of the base in case the plywood is a little bent, this way the wheels will be more likely totouch the floor and the cage won't wobble as much if the plywood is slightly uneven.
We also screwed another 42? long 3/4" x 1 3/8"wood stick underneath the base of the cage just under where the front of your cagewill be for support. Since this is where your door will need to be able to swing open, you can't have a "lip" on top, has to be underneath.
Also, screw holes in the base around the inner perimeter of the "lip" so that you can zip-tie the bottom of the cage to the base. You can make 4 drill holes in the front of the base only if you want, since the backs and sides will already have an edge. The front of the cage can't, because you need the door to open, so you can zip-tie the front grids(not the 2 for the door) to the base to keep the front bottom edge ofthe cage from buckling in or out.
Now, you are ready to attach the top of the cage and the FRONT of the cage.
For the FRONT:
Zip-tie 3 rows of grids, 3 grids across. Fasten them to the sides of the cage.
Leave the vertical middle 2 grids untied on the left sides, bottom and top (keeping the 2 grids tied together in the middle and right sideonly-see photo). This will be your door.
Use 2 binder clips to hold the door shut.
For the TOP:
I zip tied 6 grids together (2 rows of 3 grids)
Then I zip-tied the BACK ONLY of the top to the back of the cage, DONOT TIE TO THE SIDES. You want the top to hinge open, so don?t fasten the sides or front.
Now you need 1 of your 42? long sticks. I drilled a hole on each end and stuck it through the grid holes going across the top MIDDLE of thecage. I zip-tied the stick to the sides of the cage to keep it from slipping out. This provides support for the top grids and keeps them from sagging down.
THEN, I got another 42? long stick, drilled 4 holes through it, 1 oneach end and 2 in the middle, and I zip tied it to the front edge ofthetop grids of the CAGE FRONT. This also provides more support and allows the top edge of the roof to lay on the top of the cage and not sink into the cage. (See photo)
I hold the top lid down with binder clips to keep the bunny from getting the top open.
That's it!
Hope this made sense
~Denise
JadeIcing
Well-Known Member
Thanks girl that is awesome to have in here. If you ever want to come out my way and pet a bunny feel free.
TrixieRabbit
Well-Known Member
JadeIcing wrote:
Hmmm..Ct. isn't that far from NY....lol....
Thanks!Thanks girl that is awesome to have in here. If you ever want to come out my way and pet a bunny feel free.
Hmmm..Ct. isn't that far from NY....lol....
JadeIcing
Well-Known Member
TrixieRabbit wrote:
JadeIcing wrote:Thanks!Thanks girl that is awesome to have in here. If you ever want to come out my way and pet a bunny feel free.
Hmmm..Ct. isn't that far from NY....lol....

$29.46
$45.00
GUND Baby Flora The Bunny Animated Plush, Singing Stuffed Animal Toy for Ages 0 and Up, Cream, 12" (Styles May Vary)
Amazon.com

$24.48 ($0.24 / Count)
Urinary Support by Sherwood Pet Health (100 Tablets - 60 Grams)
Sherwood Forest Natural Rabbit Foods

$7.25 ($0.64 / Ounce)
Annie's Organic Friends Bunny Grahams, Chocolate Chip, Chocolate, and Honey Baked Graham Snacks, 11.25 oz
Amazon.com

$5.49 ($14.64 / lb)
Vitakraft Rabbit Popped Grains & Honey Treat Sticks 2 Pack, 3.0 Ounce
Amazon.com

$7.80
$10.98
VYG Bunny - Realistic Bunny Toy, Bunby - My Realistic Bunny Toy for Kids (Brown)
VYG-US

$38.50 ($0.53 / Ounce)
Peter Rabbit Organics Fruit Flavors Variety Pack 4 oz. Squeezable Pouches (Pack of 18)
Amazon.com

$15.15 ($0.03 / Count)
$22.29 ($0.04 / Count)
American Health Original Papaya Digestive Enzyme Chewable Tablets - Promotes Nutrient Absorption and Helps Digestion - 600 Count (200 Total Servings)
Amazon.com

$9.98 ($0.45 / Count)
Annie's Organic Berry Patch Bunny Fruit Flavored Snacks, Gluten Free, Value Pack, 22 Pouches, 15.4 oz
Amazon.com

$22.99 ($2.87 / Count)
$24.99 ($3.12 / Count)
Barydat 8 Pcs Guinea Pig Cage Liner for Guinea Pig Cage Bedding Reusable Rabbit Mat Pad Washable Training Pad Animal Sleeping Bedding Mat(16x12'',Champagne, Lake Blue, Dark Purple, Grass Green)
Shiiajina

$3.99 ($31.92 / lb)
Wild Harvest Food And Unique Edible Treats for Guinea Pigs, Hamsters, Gerbils, and Adult Rabbits
Amazon.com

$10.99
$12.00
KIDS PREFERRED Peter Rabbit Soft Book with toy, Teether and Crinkle, 5 Inches
Amazon.com

$7.98 ($0.08 / Count)
$10.49 ($0.10 / Count)
Natrol Acidophilus Probiotic 100 mg, Dietary Supplement for Healthy Gut Function, Digestive Health Capsules for Adults, 100 Capsules, Up to a 33 Day Supply
Amazon.com

$14.95 ($0.12 / Ounce)
$16.99 ($0.13 / Ounce)
Kaytee Premium Potty Training Critter Litter for Pet Ferrets, Rabbits & Other Small Animals, 8 lb
Amazon.com
swanlake
Well-Known Member
wow these look awsome, might have to look into them since FRED keeps jumping out of their enclosure right now. grr. b ut the enclosure is so nice,my dad built it from wood and fencing. so maybe we will heighten it. dont know
fred is a jumper for sure.
fred is a jumper for sure.
PixieStixxxx
Well-Known Member
I've only seen this thread like two days ago, and I just HAD to build one for my bonded pair Muffy and Labrador.
So at 9 am this morning, I bought NIC cubes from Superstore =P They're SOO happy in it. Pics coming soon!
So at 9 am this morning, I bought NIC cubes from Superstore =P They're SOO happy in it. Pics coming soon!
Spring
Well-Known Member
OH that's so great! NIC cages are my favourite.. I would never do anything other than NIC cages  I can't say enough god things about them!
Can't wait to see pictures!
Can't wait to see pictures!
undergunfire
Retired Moderator
Marlin and Brody's new NIC cages. Right now they are about 2 NIC wide by 4 NIC long  :
:


When Morgan gets here in about a month (yaaay! !!!), I will take out the middle storage area and turn that into a 3 NIC long by 2 NIC wide cage, so all bunnies will have 2x3 NIC cages....with tons of daily out-time to run around. I may have to zip tie on some solid NIC panels to the wire ones around Morgan's cage, so that there will be no fighting through the cage bars.


When Morgan gets here in about a month (yaaay!
Spring
Well-Known Member
Great cage Amy! I love the little shelf in the middle.. cute! 
undergunfire
Retired Moderator
Spring wrote:
Thanks, Leanne (am I spelling your name right?, lol) :biggrin2:!
Great cage Amy! I love the little shelf in the middle.. cute!
Thanks, Leanne (am I spelling your name right?, lol) :biggrin2:!
angoralvr
Well-Known Member
Here's the enclosure/cage I recently built for Henri. I am already thinking I am going to reconfigure the cage part though to give him more floor space and probably one less level.
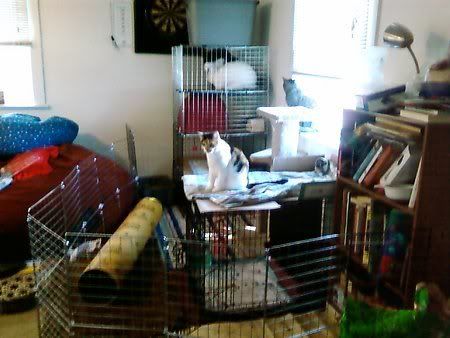
When he first came home, I used a large dog grate for his cage and he is used to having his litter box in there so I left him the crate and just made it part of his enclosure. The whole thing (pen and cage) only cost me about 40$ which is amazing compared to what I would have paid for an excercise pen and a large cage.

When he first came home, I used a large dog grate for his cage and he is used to having his litter box in there so I left him the crate and just made it part of his enclosure. The whole thing (pen and cage) only cost me about 40$ which is amazing compared to what I would have paid for an excercise pen and a large cage.
XxMontanaxX
Well-Known Member
tundrakatiebean
Well-Known Member
XxMontanaxX wrote:
looks like 16 to me..QUESTION
How many grids are in this?
XxMontanaxX
Well-Known Member
Just making sure. I tend to miscount things. :?
How many boxes do you think I'll need to make a good excercise pen for Macey?
How many boxes do you think I'll need to make a good excercise pen for Macey?
tundrakatiebean
Well-Known Member
my run is 22 grids round and 2 high  but I just used what I had left over, it's big enough that I can sit in it and have a hidey box for wash.
Hayley411
Well-Known Member
This is Sherbert and the babies new cage. It is a 2x2 with two shelves the first shelf has changed since the pic was taken. It is now a kitchen where the food and hay goes so it is not all over the fleece.I also used a big peice of cardboard instead of the coroplast for the bottom of the cage since. The only problem that I have run into in the last couple days is that two of the babies have learned that they can squeeze through the holes in the cubes. It looks pretty dumb right now because i have had to put the execise pen all the way around to stop them from getting out.
This is a pic of the front of the cage
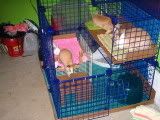
This one is of the side with the door open and thats Jasper jumping off the first shelf.
~Hayley~

This is a pic of the front of the cage

This one is of the side with the door open and thats Jasper jumping off the first shelf.
~Hayley~
naturestee
Well-Known Member
Hayley, to keep the babies from getting out go to a hardware store and buy hardware cloth. It's wire mesh, and it's conveniently cheap too LOL! Just zip tie it to the cage. That's what I do to keep kitty paws out and to keep naughty bunnies from biting each other through the cage bars. It works really well.
Hayley411
Well-Known Member
Thanks for the advice I just might have to do that if the don't double in size in the next few days.:biggrin2:The one that can't get out is twice the size of the other two, weird huh?


